

Can one conveyor belt really build a solar optimizer from bare shell to packaged unit
2026-08-07
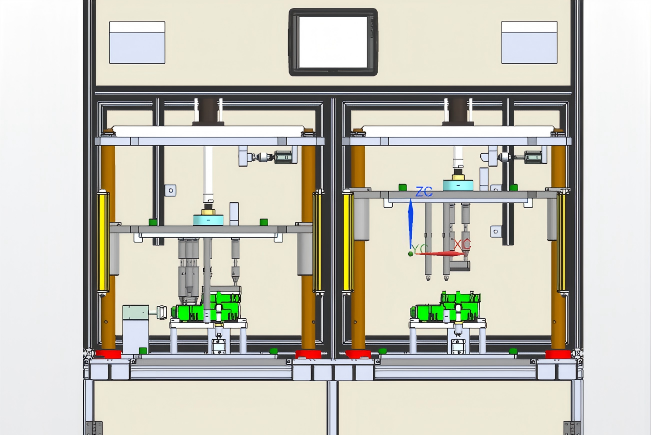
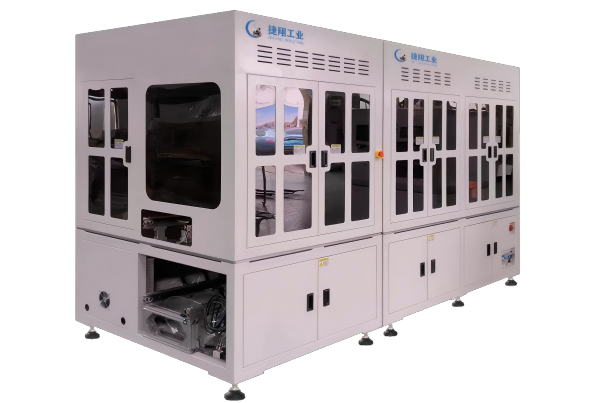
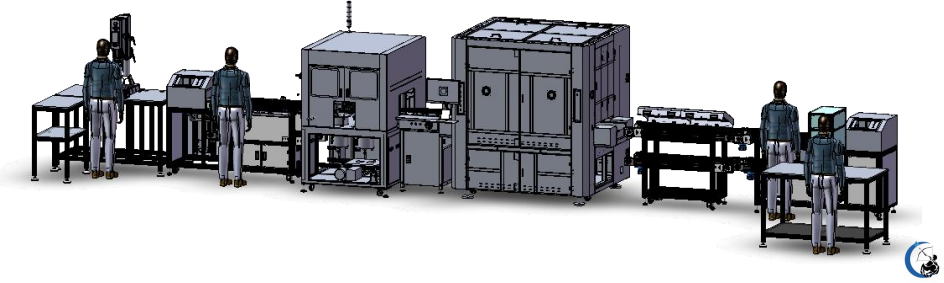
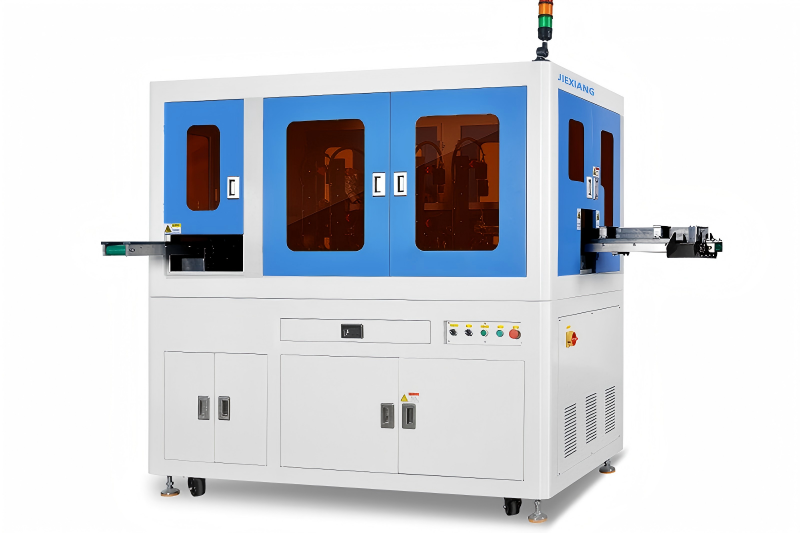
A power optimizer looks like a small plastic brick with two MC4 ports, but inside it carries a bottom shell, a thermally glued PCB, a shielded enclosure, soldered harnesses, and an ultrasonically welded cover that has to survive 25 years on a rooftop. Hand-building that at volume means 11 discrete manual stations, three shift crews, and a scrap rate that climbs every time a rookie mis-solders the harness. The Photovoltaic industry-optimizer automatic assembly line — Photovoltaic Industry Optimizer Automatic Assembly Line Automatic Bottom Shell Installation Thermal Conductive Glue Application Automatic PCB Board Installation Shielding Cover Screw Locking Harness Soldering Functional Testing Ultrasonic Welding Cover Installation Smart Industrial Automation Solutions 3C New Energy Industrialjx is the alternative: one belt-fed cell where nine equipment blocks run in sequence—bottom shell load → thermal glue → PCB place → shield cover + screw lock → PCB screw lock → solder + test → cover install → ultrasonic weld → unload—and the process flow prints a QR, hot-solders the support, locks the harness screw, solders the harness, functional-tests, ultrasonically seals the outer cover, hands off to manual wire winding, dispenses glue, vertically heat-cures, cools, unloads for retest, and packages. Built by Industrialjx (smart industrial automation solutions for 3C, new energy, photovoltaic), it replaces 11 manual benches with one traceable conveyor. But why does thermal conductive glue have to be dispensed before the PCB drops, how does ultrasonic welding beat adhesive on a 25-year outdoor cover seal, and what makes a belt-connected 9-block cell the right topology for an optimizer SKU that revises its PCB every 18 months? Below is the full breakdown for PV optimizer OEMs, microinverter brands, EMS factories, and automation buyers evaluating a line whose real spec is "one shell in, one tested unit out, QR traced at every station," not "robotic arms on a table."
Why the optimizer line is nine blocks on one belt, not one big machine
The Photovoltaic industry-optimizer automatic assembly line — Photovoltaic Industry Optimizer Automatic Assembly Line Automatic Bottom Shell Installation Thermal Conductive Glue Application Automatic PCB Board Installation Shielding Cover Screw Locking Harness Soldering Functional Testing Ultrasonic Welding Cover Installation Smart Industrial Automation Solutions 3C New Energy Industrialjx rests on five reconciled facts—glue-before-PCB thermal path, shield-cover screw sequence, solder-then-test inline, ultrasonic vs adhesive cover seal, and belt-connected modularity for PCB revision:
- Thermal Conductive Glue Is Dispensed Before The PCB Lands, Not After. A power optimizer dissipates 1–3 W continuously; the PCB power stage must transfer heat to the bottom shell, or the MOSFETs throttle. The line dispenses thermal conductive glue (silicone or epoxy, 0.2–0.5 mm bead) onto the shell boss before the automatic PCB board installation equipment places the board—so the glue wets both surfaces under placement pressure and cures later in the vertical heat oven. If the glue came after PCB placement, it would bridge SMD components and insulate the wrong nodes. The Industrialjx flow "thermal conductive glue application equipment → automatic PCB board installation equipment" is the thermal-path statement: glue first, board second, cure last.
- Shield Cover Screw Lock Then PCB Screw Lock Is A Two-Plane Torque Sequence. The shielding cover (EMI can) sits on top of the PCB and is screwed to the shell at four corners (automatic shielding cover installation and screw locking equipment); then the PCB itself is screwed to the shell standoffs (automatic PCB board screw locking equipment). Two separate screw planes, two torque windows (cover 0.4–0.6 N·m, PCB 0.6–0.9 N·m), two lock stations—because if you screw the PCB first, the shield can does not seat flat; if you share one station, cross-threading jumps. The line splits them deliberately.
- Harness Soldering + Functional Test Inline Closes The Open-Circuit Loop Before Cover Goes On. Wire harness screw locking (mechanical anchor) → wire harness soldering (electrical joint) → functional testing (input voltage sweep, MPPT response, comms ping) happens before the outer cover is installed. A bad solder joint is caught at the test station, the unit is rejected pre-cover, and the ultrasonic weld never wastes a shell. The Industrialjx flow puts "automatic soldering and testing station" ahead of "automatic cover installation equipment"—cover-on-first would mean every reject gets scrapped with a welded shell, killing yield.
- Ultrasonic Welding The Outer Cover Beats Adhesive For 25-Year UV/Heat Cycling. The outer cover on an optimizer sees -40~85 ℃ daily cycling, UV, and humidity. Adhesive (even PU) creeps and yellows; ultrasonic welding of the shell-to-cover flange (same PPO/PA66-GF material) creates a molecular bond at the joint, zero consumable, 2–3 s cycle, hermetic enough for IP67. The line runs "outer cover ultrasonic" after functional test and before manual wire winding—so the internal harness is protected before the external leads are dressed. Adhesive would need 30 min fixture cure; ultrasonic keeps the belt moving at 3–5 s/takt.
- Belt-Connected 9-Block Modularity = PCB Revision Without Rebuying The Line. Optimizer PCBs revise every 12–18 months (new MPPT IC, different shunt layout). Because the line is nine independent equipment blocks on a common conveyor—not one monolithic machine—the PCB installation block, the shield-cover screw block, and the harness-solder block can be re-teached, re-fixtured, or swapped while the shell-load, glue, ultrasonic, and unload blocks stay put. A 3C/new-energy EMS that also runs router housings on the same floor reuses the conveyor and the test framework; only the middle three blocks change. That is the Industrialjx "smart industrial automation solutions 3C new energy" pitch: one belt topology, many SKUs.
Industrialjx / industrialjx.com supply context
From the node (Photovoltaic-industry-optimizer-automatic-assembly-line) + site header (Smart Industrial Automation Solutions | 3C, New Energy) :
- Maker: Industrialjx (industrialjx.com), smart industrial automation solutions provider for 3C / new energy / photovoltaic
- Line name: Photovoltaic industry-optimizer automatic assembly line
- Topology: 9 equipment blocks in sequence on one production conveyor belt
- Automatic bottom shell installation equipment
- Thermal conductive glue application equipment
- Automatic PCB board installation equipment
- Automatic shielding cover installation and screw locking equipment
- Automatic PCB board screw locking equipment
- Automatic soldering and testing station
- Automatic cover installation equipment
- Automatic unloading equipment
- Automatic ultrasonic welding equipment
- Process flow (as published): Automatic QR code printing → hot soldering support → wire harness screw locking → wire harness soldering → functional testing → outer cover ultrasonic → manual wire winding → automatic glue dispensing → vertical heat curing → product cooling → unloading retesting → packaging
- Scope: PV power optimizer, microinverter enclosure assembly, 3C/new-energy electronic box assembly (same line topology, different fixtures)
- URL:
Key characteristics and application scope
- Product Name: Photovoltaic industry-optimizer automatic assembly line
- Alternate Terms: Industrialjx PV optimizer auto line 9-block belt thermal glue PCB shield screw ultrasonic, solar power optimizer assembly cell smart industrial automation 3C new energy, photovoltaic optimizer manufacturing line automatic bottom shell thermal conductive glue PCB screw lock harness solder functional test ultrasonic cover weld, industrialjx.com optimizer line
- Line class: Belt-connected modular assembly cell for small PV electronic enclosures (not string inverter line, not panel stringer, not battery module line)
- Core Applications:
- PV power optimizer (DC-DC, 250–700 W rating) — full shell-to-package build
- Microinverter enclosure (sub-500 W) — same line, different PCB fixture and harness jig
- 3C electronic box (router, gateway) — reuse belt + test station, swap middle blocks
- New-energy BMS/MPPT slave module — thermal-glue + shield-can sequence transfers directly
- Non-use cases: cell-string tabbing (that is stringer territory), glass lamination (module line), large cabinet assembly (needs heavier conveyor)
- Companion logic: Same Industrialjx PO pairs optimizer line + 3C router line + new-energy BMS line, sharing conveyor standard and MES handshake.
Application logic by buyer type
- PV Optimizer OEM (EU, 400k units/yr): 9-block line, takt 4 s, QR at entry, functional test 100% (MPPT sweep + PLC comms), ultrasonic cover weld IP67, vertical cure oven 15 min dwell, reject rate <800 ppm, retest gate before pack.
- Microinverter Brand (US, 250k units/yr): Same line, shield-can block re-fixtured for aluminium EMI can, harness-solder block gains tin-bismuth profile, glue block switches to phase-change TIM, ultrasonic weld on PPO shell.
- EMS Factory (SE Asia, mixed 3C+PV): Optimizer line runs days, router-housing line runs nights; middle three blocks (PCB/shield/harness) swap in 6 h, belt + unload + ultrasonic stay; one MES login.
- New-Energy Startup (CN, 60k units/yr pilot): Buy shell-load + glue + PCB + test + ultrasonic as phase-1 cell, add shield/harness/cover/unload in phase-2; conveyor pre-sized for 9 blocks from day one.
Procurement and spec checklist
When specifying Photovoltaic industry-optimizer automatic assembly line — Photovoltaic Industry Optimizer Automatic Assembly Line Automatic Bottom Shell Installation Thermal Conductive Glue Application Automatic PCB Board Installation Shielding Cover Screw Locking Harness Soldering Functional Testing Ultrasonic Welding Cover Installation Smart Industrial Automation Solutions 3C New Energy Industrialjx:
✅ Block count — confirm 9 sequential blocks on one belt (not 4 machines + manual benches).
✅ Glue order — thermal conductive glue before PCB placement; dispense pattern + bead height spec locked.
✅ Screw planes — shield cover (0.4–0.6 N·m) and PCB (0.6–0.9 N·m) are separate lock stations with torque trace.
✅ Test gate — functional test before cover install; reject path exits pre-ultrasonic.
✅ Cover seal — ultrasonic weld (not adhesive) on shell-cover flange; ask for IP67 validation report.
✅ Cure — vertical heat curing oven after manual wire winding; dwell time vs glue TDS matched.
✅ Traceability — QR print at entry, scan at every block, retest scan at unload; MES handshake documented.
✅ Modularity — conveyor pitch, block footprint, and electrical interface standardized so PCB revision swaps middle blocks only.
✅ Throughput — takt time 3–5 s; confirm belt speed vs cure-oven length math.
Conclusion: Nine blocks on one belt is the optimizer build answer
The Photovoltaic industry-optimizer automatic assembly line — Photovoltaic Industry Optimizer Automatic Assembly Line Automatic Bottom Shell Installation Thermal Conductive Glue Application Automatic PCB Board Installation Shielding Cover Screw Locking Harness Soldering Functional Testing Ultrasonic Welding Cover Installation Smart Industrial Automation Solutions 3C New Energy Industrialjx is not a robotic arm on a table and not a stringer for solar cells. It is nine purpose-built equipment blocks—shell load, thermal glue, PCB place, shield-can screw, PCB screw, solder+test, cover install, ultrasonic weld, unload—chained on one conveyor so a bare bottom shell enters at station 1 and a QR-traced, functionally tested, ultrasonically sealed optimizer drops at the unload retest 12 steps later. Thermal glue wets before the PCB lands, the shield can and PCB lock on separate torque planes, the solder joint is electrically verified before the cover welds shut, and the outer cover bonds by ultrasound not adhesive so the 25-year rooftop cycle does not creep the seal. Made by Industrialjx under its 3C/new-energy/photovoltaic automation banner, the line swaps its middle three blocks when the PCB revs and keeps the belt, the test framework, and the MES handshake—so the same cell builds optimizers on the day shift and router housings on the night shift. Its metric is "one shell in, one tested unit out, zero un-traced rejects," not "cycles per minute on a demo video."
Recent Posts
Contact US
Product Information
Quantity
Unit
Piece
Support order samples, customization, wholesale direct, and complete payment. If the product you look for does not have corresponding customized content, pls fill out the form below to contact us, and we will reply ASAP.